ESP32-CAM Post Images to Local or Cloud Server using PHP (Photo Manager)
ผู้แต่ง: น.ส.ดรุณจรีย์ เขมนันทิภาคย์
เรียนรู้วิธีส่งคำขอ HTTP POST โดยใช้บอร์ด ESP32-CAM พร้อมด้วย Arduino IDE เพื่อส่งรูปภาพไปยังเซิร์ฟเวอร์ จะแสดงวิธีการโพสต์ภาพ JPG/JPEG ไปยังเซิร์ฟเวอร์ภายในเครื่อง (เซิร์ฟเวอร์ Raspberry Pi LAMP) หรือไปยังเซิร์ฟเวอร์คลาวด์ (ที่สามารถเข้าถึงได้จากทุกที่) รูปภาพจะแสดงในแกลเลอรีซึ่งสามารถดูหรือลบรูปภาพได้ หากต้องการบันทึกรูปภาพในเซิร์ฟเวอร์และสร้างแกลเลอรี จะใช้สคริปต์ PHP
หากต้องการสร้างโปรเจ็กต์นี้ จะต้องทำตามขั้นตอนถัดไป ปฏิบัติตามคำแนะนำของ LAMP Server หรือ Hosting Server ขึ้นอยู่กับว่าต้องการเข้าถึงรูปภาพในเครื่องหรือจากที่ใดก็ได้
1.โฮสต์แอปพลิเคชัน PHP
1.Raspberry Pi LAMP Server (การเข้าถึงภายในเครื่อง)
2.โฮสติ้งเซิร์ฟเวอร์ (เข้าถึงได้จากทุกที่)
2.สคริปต์ PHP เพื่อบันทึกและแสดงรูปภาพในเซิร์ฟเวอร์
1.Raspberry Pi LAMP Server (การเข้าถึงภายในเครื่อง)
2.โฮสติ้งเซิร์ฟเวอร์ (เข้าถึงได้จากทุกที่)
3.ตั้งโปรแกรม ESP32-CAM ด้วย Arduino IDE
4.การทดสอบและการสาธิตขั้นสุดท้าย
1. โฮสต์แอปพลิเคชัน PHP
เป้าหมายของโปรเจ็กต์นี้คือการมีเซิร์ฟเวอร์ในเครื่องหรือบนคลาวด์เพื่อจัดเก็บและเข้าถึงรูปภาพ ESP32-CAM
1. เซิร์ฟเวอร์ท้องถิ่น Raspberry Pi:
ด้วยเซิร์ฟเวอร์ Raspberry Pi LAMP สามารถเข้าถึงรูปภาพในเครื่องได้ (ดังภาพด้านล่าง)

สามารถเรียกใช้เซิร์ฟเวอร์ LAMP (Linux, Apache, MySQL, PHP) บน Raspberry Pi เพื่อเข้าถึงข้อมูลในเครือข่ายท้องถิ่นได้ เซิร์ฟเวอร์ Raspberry Pi LAMP: เซิร์ฟเวอร์ Linux ภายในที่ใช้เพื่อเข้าถึงรูปภาพในเครื่อง
2. เซิร์ฟเวอร์คลาวด์ (โซลูชันโฮสติ้ง Bluehost)
สามารถแสดงภาพภาพถ่าย ESP32-CAM ได้จากทุกที่ในโลกโดยเข้าถึงเซิร์ฟเวอร์ + โดเมน ต่อไปนี้เป็นภาพรวมระดับสูงเกี่ยวกับวิธีการทำงาน:

Bluehost (ใช้งานง่ายด้วย cPanel): ชื่อโดเมนฟรีเมื่อสมัครแผน 3 ปี ให้เลือกตัวเลือกเว็บไซต์ไม่จำกัด โปรดทราบว่าบริการโฮสติ้งใดๆ ที่ให้บริการ PHP จะใช้ได้กับบทช่วยสอนนี้ หากไม่มีบัญชีโฮสติ้ง ให้สมัครใช้งาน Bluehost
เมื่อซื้อบัญชีโฮสติ้ง จะต้องซื้อชื่อโดเมนด้วย นี่คือสิ่งที่ทำให้โปรเจ็กต์นี้น่าสนใจ: จะสามารถไปที่ชื่อโดเมน (http://example.com) และดูภาพถ่าย ESP32-CAM ได้
วิธีการร้องขอ HTTP POST
Hypertext Transfer Protocol (HTTP) ทำงานเป็นโปรโตคอลตอบสนองคำขอระหว่างไคลเอนต์และเซิร์ฟเวอร์ นี่คือตัวอย่าง:
ESP32 (ไคลเอนต์) ส่งคำขอ HTTP ไปยังเซิร์ฟเวอร์ (เช่น: เซิร์ฟเวอร์ RPi Lamp ในเครื่องหรือ example.com)
เซิร์ฟเวอร์ส่งคืนการตอบสนองต่อ ESP32 (ไคลเอนต์)
HTTP POST ใช้เพื่อส่งข้อมูลไปยังเซิร์ฟเวอร์เพื่อสร้าง/อัปเดตทรัพยากร ตัวอย่างเช่น เผยแพร่รูปภาพไปยังเซิร์ฟเวอร์
POST /upload.php HTTP/1.1
Host: example.com
Content-Type: image/jpeg
2.1. การเตรียมไฟล์ php และโฟลเดอร์อัพโหลด (เซิร์ฟเวอร์ Raspberry Pi LAMP)
ส่วนนี้จะเตรียมไฟล์ .php และโฟลเดอร์อัพโหลดสำหรับ Raspberry Pi LAMP Server หากใช้เซิร์ฟเวอร์ + ชื่อโดเมน
ให้ข้ามไปยังส่วนถัดไป
การมี Raspberry Pi ที่ใช้ Apache และ PHP ในหน้าต่างเทอร์มินัลของบอร์ด Raspberry Pi ให้ไปที่ไดเร็กทอรี /var/www/html/:
pi@raspberrypi:~ $ cd /var/www/html/
สร้างโฟลเดอร์ใหม่ที่เรียกว่าการอัพโหลด:
pi@raspberrypi:/var/www/html $ mkdir uploads
pi@raspberrypi:/var/www/html $ ls
uploads
ในขณะนี้ /var/www/html เป็นของ root ใช้คำสั่งถัดไปเพื่อเปลี่ยนเป็นผู้ใช้ pi และให้สิทธิ์ทั้งหมดเพื่อให้สามารถบันทึกรูปภาพโดยใช้สคริปต์ PHP ในภายหลัง
sudo chown -R pi:pi /var/www/html
chmod -R 777 /var/www/html/
สุดท้าย ให้สร้างไฟล์ upload.php ใหม่
pi@raspberrypi:/var/www/html $ nano upload.php
สคริปต์ PHP นี้มีหน้าที่รับภาพที่เข้ามาจาก ESP32-CAM เปลี่ยนชื่อภาพด้วยการประทับเวลา และจัดเก็บไว้ในโฟลเดอร์อัพโหลด แก้ไขไฟล์ที่สร้างขึ้นใหม่ (upload.php) และคัดลอกตัวอย่างต่อไปนี้
<?php
// Rui Santos
// Complete project details at https://RandomNerdTutorials.com/esp32-cam-post-image-photo-server/
// Code Based on this example: w3schools.com/php/php_file_upload.asp

$target_dir = "uploads/";
$datum = mktime(date('H')+0, date('i'), date('s'), date('m'), date('d'), date('y'));
$target_file = $target_dir . date('Y.m.d_H:i:s_', $datum) . basename($_FILES["imageFile"]["name"]);
$uploadOk = 1;
$imageFileType = strtolower(pathinfo($target_file,PATHINFO_EXTENSION));

// Check if image file is a actual image or fake image
if(isset($_POST["submit"])) {
  $check = getimagesize($_FILES["imageFile"]["tmp_name"]);
  if($check !== false) {
    echo "File is an image - " . $check["mime"] . ".";
    $uploadOk = 1;
  }
  else {
    echo "File is not an image.";
    $uploadOk = 0;
  }
}

// Check if file already exists
if (file_exists($target_file)) {
  echo "Sorry, file already exists.";
  $uploadOk = 0;
}

// Check file size
if ($_FILES["imageFile"]["size"] > 500000) {
  echo "Sorry, your file is too large.";
  $uploadOk = 0;
}

// Allow certain file formats
if($imageFileType != "jpg" && $imageFileType != "png" && $imageFileType != "jpeg"
&& $imageFileType != "gif" ) {
  echo "Sorry, only JPG, JPEG, PNG & GIF files are allowed.";
  $uploadOk = 0;
}

// Check if $uploadOk is set to 0 by an error
if ($uploadOk == 0) {
  echo "Sorry, your file was not uploaded.";
// if everything is ok, try to upload file
}
else {
  if (move_uploaded_file($_FILES["imageFile"]["tmp_name"], $target_file)) {
    echo "The file ". basename( $_FILES["imageFile"]["name"]). " has been uploaded.";
  }
  else {
    echo "Sorry, there was an error uploading your file.";
  }
}
?>
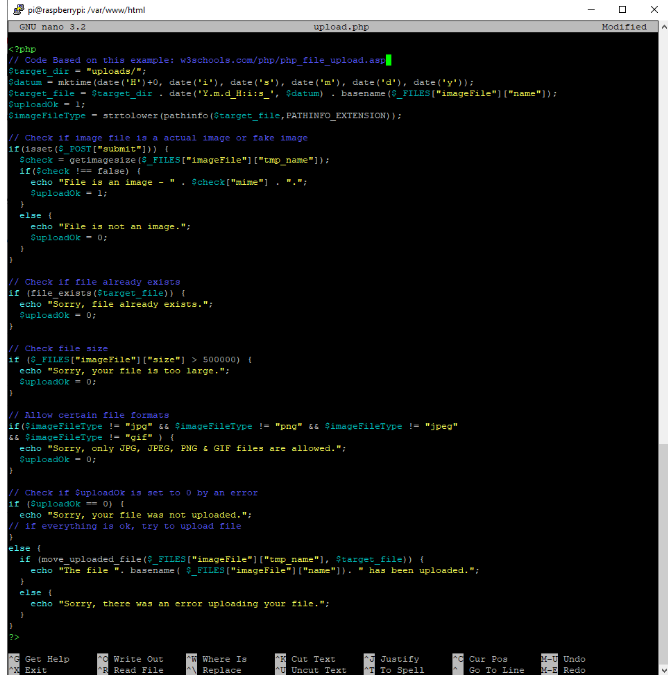
ไฟล์ upload.php ควรมีลักษณะเช่นนี้ บันทึกไฟล์และออก (Ctrl+X, Y และปุ่ม Enter):
จากนั้นสร้างไฟล์ gallery.php ใหม่:
pi@raspberrypi:/var/www/html $ nano gallery.php
แก้ไขไฟล์ที่สร้างขึ้นใหม่ (gallery.php) และคัดลอกส่วนย่อยต่อไปนี้:
<!--
  Rui Santos
  Complete project details at https://RandomNerdTutorials.com/esp32-cam-post-image-photo-server/

  Permission is hereby granted, free of charge, to any person obtaining a copy
  of this software and associated documentation files.

  The above copyright notice and this permission notice shall be included in all
  copies or substantial portions of the Software.
-->
<!DOCTYPE html>
<html>
<head>
  <title>ESP32-CAM Photo Gallery</title>
  <meta name="viewport" content="width=device-width, initial-scale=1.0">
  <style>
    .flex-container {
      display: flex;
      flex-wrap: wrap;
    }
    .flex-container > div {
      text-align: center;
      margin: 10px;
    }
  </style>
</head><body>
<h2>ESP32-CAM Photo Gallery</h2>
<?php
  // Image extensions
  $image_extensions = array("png","jpg","jpeg","gif");

  // Check delete HTTP GET request - remove images
  if(isset($_GET["delete"])){
    $imageFileType = strtolower(pathinfo($_GET["delete"],PATHINFO_EXTENSION));
    if (file_exists($_GET["delete"]) && ($imageFileType == "jpg" ||  $imageFileType == "png" ||  $imageFileType == "jpeg") ) {
      echo "File found and deleted: " .  $_GET["delete"];
      unlink($_GET["delete"]);
    }
    else {
      echo 'File not found - <a href="gallery.php">refresh</a>';
    }
  }
  // Target directory
  $dir = 'uploads/';
  if (is_dir($dir)){
    echo '<div class="flex-container">';
    $count = 1;
    $files = scandir($dir);
    rsort($files);
    foreach ($files as $file) {
      if ($file != '.' && $file != '..') {?>
        <div>
          <p><a href="gallery.php?delete=<?php echo $dir . $file; ?>">Delete file</a> - <?php echo $file; ?></p>
          <a href="<?php echo $dir . $file; ?>">
            <img src="<?php echo $dir . $file; ?>" style="width: 350px;" alt="" title=""/>
          </a>
       </div>
<?php
       $count++;
      }
    }
  }
  if($count==1) { echo "<p>No images found</p>"; }
?>
  </div>
</body>
</html>

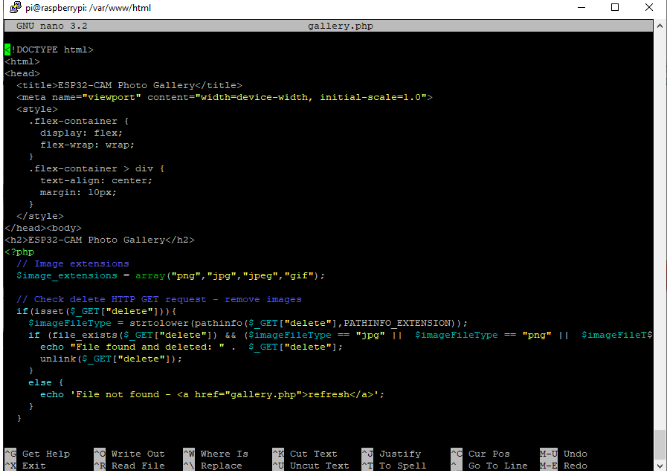
สคริปต์ PHP นี้มีหน้าที่ในการแสดงภาพในแกลเลอรี ไฟล์ gallery.php ควรมีลักษณะเช่นนี้ บันทึกไฟล์และออก (Ctrl+X, Y และปุ่ม Enter):
2.2. การเตรียมไฟล์ .php และโฟลเดอร์อัพโหลด (บริการโฮสติ้ง)
ต้องการใช้งานเซิร์ฟเวอร์จากระยะไกลและเข้าถึงรูปภาพได้จากทุกที่ ต้องมีบัญชีโฮสติ้ง หลังจากสมัครบัญชีโฮสติ้งและตั้งชื่อโดเมนแล้ว สามารถเข้าสู่ระบบ cPanel หรือแดชบอร์ดที่คล้ายกันได้ หลังจากนั้นให้เปิดตัวจัดการไฟล์
เปิดแท็บ “ขั้นสูง” และเลือก “ตัวจัดการไฟล์”:

จากนั้นเลือกตัวเลือก public_html กดปุ่ม “+ ไฟล์” เพื่อสร้างไฟล์ upload.php ใหม่และไฟล์ gallery.php ใหม่
จากนั้นคลิกปุ่ม “+โฟลเดอร์” เพื่อสร้างโฟลเดอร์อัปโหลด

เมื่อสร้างทั้งสามรายการแล้ว ให้แก้ไขไฟล์ upload.php:

สคริปต์ PHP นี้มีหน้าที่รับภาพที่เข้ามาจาก ESP32-CAM เปลี่ยนชื่อภาพด้วยการประทับเวลา และจัดเก็บไว้ในโฟลเดอร์อัพโหลด แก้ไขไฟล์ที่สร้างขึ้นใหม่ (upload.php) และคัดลอกส่วนย่อยต่อไปนี้:
<?php
// Rui Santos
// Complete project details at https://RandomNerdTutorials.com/esp32-cam-post-image-photo-server/
// Code Based on this example: w3schools.com/php/php_file_upload.asp

$target_dir = "uploads/";
$datum = mktime(date('H')+0, date('i'), date('s'), date('m'), date('d'), date('y'));
$target_file = $target_dir . date('Y.m.d_H:i:s_', $datum) . basename($_FILES["imageFile"]["name"]);
$uploadOk = 1;
$imageFileType = strtolower(pathinfo($target_file,PATHINFO_EXTENSION));

// Check if image file is a actual image or fake image
if(isset($_POST["submit"])) {
  $check = getimagesize($_FILES["imageFile"]["tmp_name"]);
  if($check !== false) {
    echo "File is an image - " . $check["mime"] . ".";
    $uploadOk = 1;
  }
  else {
    echo "File is not an image.";
    $uploadOk = 0;
  }
}

// Check if file already exists
if (file_exists($target_file)) {
  echo "Sorry, file already exists.";
  $uploadOk = 0;
}

// Check file size
if ($_FILES["imageFile"]["size"] > 500000) {
  echo "Sorry, your file is too large.";
  $uploadOk = 0;
}

// Allow certain file formats
if($imageFileType != "jpg" && $imageFileType != "png" && $imageFileType != "jpeg"
&& $imageFileType != "gif" ) {
  echo "Sorry, only JPG, JPEG, PNG & GIF files are allowed.";
  $uploadOk = 0;
}

// Check if $uploadOk is set to 0 by an error
if ($uploadOk == 0) {
  echo "Sorry, your file was not uploaded.";
// if everything is ok, try to upload file
}
else {
  if (move_uploaded_file($_FILES["imageFile"]["tmp_name"], $target_file)) {
    echo "The file ". basename( $_FILES["imageFile"]["name"]). " has been uploaded.";
  }
  else {
    echo "Sorry, there was an error uploading your file.";
  }
}
?>

บันทึกไฟล์และออก
จากนั้น แก้ไขไฟล์ gallery.php และคัดลอกส่วนย่อยต่อไปนี้ มีหน้าที่แสดงภาพในแกลเลอรี
<!--
  Rui Santos
  Complete project details at https://RandomNerdTutorials.com/esp32-cam-post-image-photo-server/

  Permission is hereby granted, free of charge, to any person obtaining a copy
  of this software and associated documentation files.

  The above copyright notice and this permission notice shall be included in all
  copies or substantial portions of the Software.
-->
<!DOCTYPE html>
<html>
<head>
  <title>ESP32-CAM Photo Gallery</title>
  <meta name="viewport" content="width=device-width, initial-scale=1.0">
  <style>
    .flex-container {
      display: flex;
      flex-wrap: wrap;
    }
    .flex-container > div {
      text-align: center;
      margin: 10px;
    }
  </style>
</head><body>
<h2>ESP32-CAM Photo Gallery</h2>
<?php
  // Image extensions
  $image_extensions = array("png","jpg","jpeg","gif");

  // Check delete HTTP GET request - remove images
  if(isset($_GET["delete"])){
    $imageFileType = strtolower(pathinfo($_GET["delete"],PATHINFO_EXTENSION));
    if (file_exists($_GET["delete"]) && ($imageFileType == "jpg" ||  $imageFileType == "png" ||  $imageFileType == "jpeg") ) {
      echo "File found and deleted: " .  $_GET["delete"];
      unlink($_GET["delete"]);
    }
    else {
      echo 'File not found - <a href="gallery.php">refresh</a>';
    }
  }
  // Target directory
  $dir = 'uploads/';
  if (is_dir($dir)){
    echo '<div class="flex-container">';
    $count = 1;
    $files = scandir($dir);
    rsort($files);
    foreach ($files as $file) {
      if ($file != '.' && $file != '..') {?>
        <div>
          <p><a href="gallery.php?delete=<?php echo $dir . $file; ?>">Delete file</a> - <?php echo $file; ?></p>
          <a href="<?php echo $dir . $file; ?>">
            <img src="<?php echo $dir . $file; ?>" style="width: 350px;" alt="" title=""/>
          </a>
       </div>
<?php
       $count++;
      }
    }
  }
  if($count==1) { echo "<p>No images found</p>"; }
?>
  </div>
</body>
</html>

บันทึกไฟล์และออก เซิร์ฟเวอร์พร้อมแล้ว

3. ESP32-CAM HTTP โพสต์รูปภาพ/ภาพถ่ายไปยังเซิร์ฟเวอร์
เตรียมเซิร์ฟเวอร์พร้อมแล้ว (เซิร์ฟเวอร์ Raspberry Pi LAMP หรือเซิร์ฟเวอร์คลาวด์) ก็ถึงเวลาเตรียม ESP32-CAM พร้อมโค้ดเพื่อเผยแพร่อิมเมจใหม่ไปยังเซิร์ฟเวอร์ทุกๆ 30 วินาที ก่อนดำเนินการบทช่วยสอนนี้
ตรวจสอบให้แน่ใจว่าได้ทำตามข้อกำหนดเบื้องต้นต่อไปนี้แล้ว

จำเป็นต้องใช้ชิ้นส่วน
หากต้องการติดตามบทช่วยสอน ต้องมีส่วนประกอบต่อไปนี้:
-ESP32-CAM พร้อม OV2640 – อ่านบอร์ดพัฒนา ESP32-CAM ที่ดีที่สุด
-โปรแกรมเมอร์ FTDI
สายจัมเปอร์ตัวเมียถึงตัวเมีย
-แหล่งจ่ายไฟ 5V สำหรับ ESP32-CAM
เซิร์ฟเวอร์ท้องถิ่น:
-บอร์ด Raspberry Pi – อ่านชุดเริ่มต้น Raspberry Pi ที่ดีที่สุด
-การ์ด MicroSD – 32GB คลาส 10
-พาวเวอร์ซัพพลาย Raspberry Pi (5V 2.5A)
-เซิร์ฟเวอร์คลาวด์ (ทางเลือก): Bluehost

สามารถใช้ลิงก์ก่อนหน้าหรือไปที่ MakerAdvisor.com/tools โดยตรงเพื่อค้นหาชิ้นส่วนทั้งหมดสำหรับโครงการ
Arduino IDE
จะตั้งโปรแกรม ESP32-CAM โดยใช้ Arduino IDE ดังนั้นตรวจสอบให้แน่ใจว่าได้ติดตั้งส่วนเสริม ESP32 แล้ว

ตรวจสอบ URL ของ PHP
ลองเปิดที่อยู่ IP ในเครื่องของ Raspberry Pi หรือชื่อโดเมน example.com ภายนอกตามด้วย /upload.php ที่ควรส่งคืน:
Sorry, only JPG, JPEG, PNG & GIF files are allowed.Sorry, your file was notuploaded.
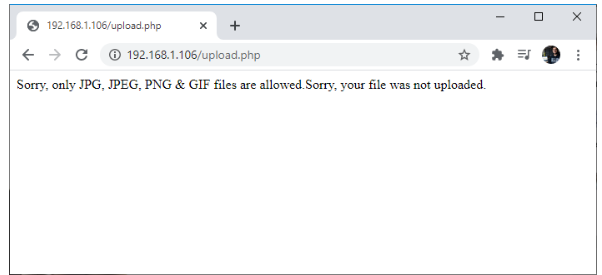
หากเห็นข้อความดังกล่าวให้บันทึก URL/ชื่อโดเมนและเส้นทาง แสดงว่าเซิร์ฟเวอร์พร้อมแล้วและสามารถดำเนินการต่อตามคำแนะนำนี้ได้
นอกจากนี้ ให้ลองเข้าถึงเส้นทาง /gallery.php ควรได้รับบางอย่างตามที่แสดงด้านล่าง:

ESP32-CAM Code
หากใช้เซิร์ฟเวอร์ภายในที่ไม่มี TLS/SSL หรือเซิร์ฟเวอร์คลาวด์ที่ไม่รองรับ HTTPS ให้ใช้รหัสคำขอ HTTP POST
หากใช้เซิร์ฟเวอร์คลาวด์ที่ต้องมีคำขอ HTTPS ให้ใช้รหัสนี้แทน: รหัสคำขอ HTTPS POST
คำขอ HTTP POST ESP32-CAM
ภาพร่างถัดไปจะโพสต์ภาพไปยังเซิร์ฟเวอร์โดยใช้ HTTP POST คัดลอกโค้ดด้านล่างไปยัง Arduino IDE
/*
  Rui Santos
  Complete project details at https://RandomNerdTutorials.com/esp32-cam-post-image-photo-server/

  Permission is hereby granted, free of charge, to any person obtaining a copy
  of this software and associated documentation files.

  The above copyright notice and this permission notice shall be included in all
  copies or substantial portions of the Software.
*/

#include <Arduino.h>
#include <WiFi.h>
#include "soc/soc.h"
#include "soc/rtc_cntl_reg.h"
#include "esp_camera.h"

const char* ssid = "REPLACE_WITH_YOUR_SSID";
const char* password = "REPLACE_WITH_YOUR_PASSWORD";

String serverName = "192.168.1.XXX";   // REPLACE WITH YOUR Raspberry Pi IP ADDRESS
//String serverName = "example.com";   // OR REPLACE WITH YOUR DOMAIN NAME

String serverPath = "/upload.php";     // The default serverPath should be upload.php

const int serverPort = 80;

WiFiClient client;

// CAMERA_MODEL_AI_THINKER
#define PWDN_GPIO_NUM     32
#define RESET_GPIO_NUM    -1
#define XCLK_GPIO_NUM      0
#define SIOD_GPIO_NUM     26
#define SIOC_GPIO_NUM     27

#define Y9_GPIO_NUM       35
#define Y8_GPIO_NUM       34
#define Y7_GPIO_NUM       39
#define Y6_GPIO_NUM       36
#define Y5_GPIO_NUM       21
#define Y4_GPIO_NUM       19
#define Y3_GPIO_NUM       18
#define Y2_GPIO_NUM        5
#define VSYNC_GPIO_NUM    25
#define HREF_GPIO_NUM     23
#define PCLK_GPIO_NUM     22

const int timerInterval = 30000;    // time between each HTTP POST image
unsigned long previousMillis = 0;   // last time image was sent

void setup() {
  WRITE_PERI_REG(RTC_CNTL_BROWN_OUT_REG, 0);
  Serial.begin(115200);

  WiFi.mode(WIFI_STA);
  Serial.println();
  Serial.print("Connecting to ");
  Serial.println(ssid);
  WiFi.begin(ssid, password);
  while (WiFi.status() != WL_CONNECTED) {
    Serial.print(".");
    delay(500);
  }
  Serial.println();
  Serial.print("ESP32-CAM IP Address: ");
  Serial.println(WiFi.localIP());

  camera_config_t config;
  config.ledc_channel = LEDC_CHANNEL_0;
  config.ledc_timer = LEDC_TIMER_0;
  config.pin_d0 = Y2_GPIO_NUM;
  config.pin_d1 = Y3_GPIO_NUM;
  config.pin_d2 = Y4_GPIO_NUM;
  config.pin_d3 = Y5_GPIO_NUM;
  config.pin_d4 = Y6_GPIO_NUM;
  config.pin_d5 = Y7_GPIO_NUM;
  config.pin_d6 = Y8_GPIO_NUM;
  config.pin_d7 = Y9_GPIO_NUM;
  config.pin_xclk = XCLK_GPIO_NUM;
  config.pin_pclk = PCLK_GPIO_NUM;
  config.pin_vsync = VSYNC_GPIO_NUM;
  config.pin_href = HREF_GPIO_NUM;
  config.pin_sscb_sda = SIOD_GPIO_NUM;
  config.pin_sscb_scl = SIOC_GPIO_NUM;
  config.pin_pwdn = PWDN_GPIO_NUM;
  config.pin_reset = RESET_GPIO_NUM;
  config.xclk_freq_hz = 20000000;
  config.pixel_format = PIXFORMAT_JPEG;

  // init with high specs to pre-allocate larger buffers
  if(psramFound()){
    config.frame_size = FRAMESIZE_SVGA;
    config.jpeg_quality = 10;  //0-63 lower number means higher quality
    config.fb_count = 2;
  } else {
    config.frame_size = FRAMESIZE_CIF;
    config.jpeg_quality = 12;  //0-63 lower number means higher quality
    config.fb_count = 1;
  }

  // camera init
  esp_err_t err = esp_camera_init(&config);
  if (err != ESP_OK) {
    Serial.printf("Camera init failed with error 0x%x", err);
    delay(1000);
    ESP.restart();
  }

  sendPhoto();
}

void loop() {
  unsigned long currentMillis = millis();
  if (currentMillis - previousMillis >= timerInterval) {
    sendPhoto();
    previousMillis = currentMillis;
  }
}

String sendPhoto() {
  String getAll;
  String getBody;

  camera_fb_t * fb = NULL;
  fb = esp_camera_fb_get();
  if(!fb) {
    Serial.println("Camera capture failed");
    delay(1000);
    ESP.restart();
  }

  Serial.println("Connecting to server: " + serverName);

  if (client.connect(serverName.c_str(), serverPort)) {
    Serial.println("Connection successful!");
    String head = "--RandomNerdTutorials\r\nContent-Disposition: form-data; name=\"imageFile\"; filename=\"esp32-cam.jpg\"\r\nContent-Type: image/jpeg\r\n\r\n";
    String tail = "\r\n--RandomNerdTutorials--\r\n";

    uint32_t imageLen = fb->len;
    uint32_t extraLen = head.length() + tail.length();
    uint32_t totalLen = imageLen + extraLen;

    client.println("POST " + serverPath + " HTTP/1.1");
    client.println("Host: " + serverName);
    client.println("Content-Length: " + String(totalLen));
    client.println("Content-Type: multipart/form-data; boundary=RandomNerdTutorials");
    client.println();
    client.print(head);

    uint8_t *fbBuf = fb->buf;
    size_t fbLen = fb->len;
    for (size_t n=0; n<fbLen; n=n+1024) {
      if (n+1024 < fbLen) {
        client.write(fbBuf, 1024);
        fbBuf += 1024;
      }
      else if (fbLen%1024>0) {
        size_t remainder = fbLen%1024;
        client.write(fbBuf, remainder);
      }
    }
    client.print(tail);

    esp_camera_fb_return(fb);

    int timoutTimer = 10000;
    long startTimer = millis();
    boolean state = false;

    while ((startTimer + timoutTimer) > millis()) {
      Serial.print(".");
      delay(100);
      while (client.available()) {
        char c = client.read();
        if (c == '\n') {
          if (getAll.length()==0) { state=true; }
          getAll = "";
        }
        else if (c != '\r') { getAll += String(c); }
        if (state==true) { getBody += String(c); }
        startTimer = millis();
      }
      if (getBody.length()>0) { break; }
    }
    Serial.println();
    client.stop();
    Serial.println(getBody);
  }
  else {
    getBody = "Connection to " + serverName +  " failed.";
    Serial.println(getBody);
  }
  return getBody;
}

คำขอโพสต์ HTTPS ESP32-CAM
ภาพร่างถัดไปจะโพสต์ภาพไปยังเซิร์ฟเวอร์โดยใช้ HTTPS POST คัดลอกโค้ดด้านล่างไปยัง Arduino IDE

/*
  Rui Santos
  Complete project details at:
  https://RandomNerdTutorials.com/esp32-cam-http-post-php-arduino/
  https://RandomNerdTutorials.com/esp32-cam-post-image-photo-server/

  Permission is hereby granted, free of charge, to any person obtaining a copy
  of this software and associated documentation files.

  The above copyright notice and this permission notice shall be included in all
  copies or substantial portions of the Software.
*/

#include <Arduino.h>
#include <WiFi.h>
#include <WiFiClientSecure.h>
#include "soc/soc.h"
#include "soc/rtc_cntl_reg.h"
#include "esp_camera.h"

const char* ssid = "REPLACE_WITH_YOUR_SSID";
const char* password = "REPLACE_WITH_YOUR_PASSWORD";

String serverName = "example.com";   //REPLACE WITH YOUR DOMAIN NAME

String serverPath = "/upload.php";     // The default serverPath should be upload.php

const int serverPort = 443; //server port for HTTPS

WiFiClientSecure client;

// CAMERA_MODEL_AI_THINKER
#define PWDN_GPIO_NUM     32
#define RESET_GPIO_NUM    -1
#define XCLK_GPIO_NUM      0
#define SIOD_GPIO_NUM     26
#define SIOC_GPIO_NUM     27

#define Y9_GPIO_NUM       35
#define Y8_GPIO_NUM       34
#define Y7_GPIO_NUM       39
#define Y6_GPIO_NUM       36
#define Y5_GPIO_NUM       21
#define Y4_GPIO_NUM       19
#define Y3_GPIO_NUM       18
#define Y2_GPIO_NUM        5
#define VSYNC_GPIO_NUM    25
#define HREF_GPIO_NUM     23
#define PCLK_GPIO_NUM     22

const int timerInterval = 30000;    // time between each HTTP POST image
unsigned long previousMillis = 0;   // last time image was sent

void setup() {
  WRITE_PERI_REG(RTC_CNTL_BROWN_OUT_REG, 0);
  Serial.begin(115200);

  WiFi.mode(WIFI_STA);
  Serial.println();
  Serial.print("Connecting to ");
  Serial.println(ssid);
  WiFi.begin(ssid, password);
  while (WiFi.status() != WL_CONNECTED) {
    Serial.print(".");
    delay(500);
  }
  Serial.println();
  Serial.print("ESP32-CAM IP Address: ");
  Serial.println(WiFi.localIP());

  camera_config_t config;
  config.ledc_channel = LEDC_CHANNEL_0;
  config.ledc_timer = LEDC_TIMER_0;
  config.pin_d0 = Y2_GPIO_NUM;
  config.pin_d1 = Y3_GPIO_NUM;
  config.pin_d2 = Y4_GPIO_NUM;
  config.pin_d3 = Y5_GPIO_NUM;
  config.pin_d4 = Y6_GPIO_NUM;
  config.pin_d5 = Y7_GPIO_NUM;
  config.pin_d6 = Y8_GPIO_NUM;
  config.pin_d7 = Y9_GPIO_NUM;
  config.pin_xclk = XCLK_GPIO_NUM;
  config.pin_pclk = PCLK_GPIO_NUM;
  config.pin_vsync = VSYNC_GPIO_NUM;
  config.pin_href = HREF_GPIO_NUM;
  config.pin_sscb_sda = SIOD_GPIO_NUM;
  config.pin_sscb_scl = SIOC_GPIO_NUM;
  config.pin_pwdn = PWDN_GPIO_NUM;
  config.pin_reset = RESET_GPIO_NUM;
  config.xclk_freq_hz = 20000000;
  config.pixel_format = PIXFORMAT_JPEG;

  // init with high specs to pre-allocate larger buffers
  if(psramFound()){
    config.frame_size = FRAMESIZE_SVGA;
    config.jpeg_quality = 10;  //0-63 lower number means higher quality
    config.fb_count = 2;
  } else {
    config.frame_size = FRAMESIZE_CIF;
    config.jpeg_quality = 12;  //0-63 lower number means higher quality
    config.fb_count = 1;
  }

  // camera init
  esp_err_t err = esp_camera_init(&config);
  if (err != ESP_OK) {
    Serial.printf("Camera init failed with error 0x%x", err);
    delay(1000);
    ESP.restart();
  }

  sendPhoto();
}

void loop() {
  unsigned long currentMillis = millis();
  if (currentMillis - previousMillis >= timerInterval) {
    sendPhoto();
    previousMillis = currentMillis;
  }
}

String sendPhoto() {
  String getAll;
  String getBody;

  camera_fb_t * fb = NULL;
  fb = esp_camera_fb_get();
  if(!fb) {
    Serial.println("Camera capture failed");
    delay(1000);
    ESP.restart();
  }

  Serial.println("Connecting to server: " + serverName);

  client.setInsecure(); //skip certificate validation
  if (client.connect(serverName.c_str(), serverPort)) {
    Serial.println("Connection successful!");
    String head = "--RandomNerdTutorials\r\nContent-Disposition: form-data; name=\"imageFile\"; filename=\"esp32-cam.jpg\"\r\nContent-Type: image/jpeg\r\n\r\n";
    String tail = "\r\n--RandomNerdTutorials--\r\n";

    uint32_t imageLen = fb->len;
    uint32_t extraLen = head.length() + tail.length();
    uint32_t totalLen = imageLen + extraLen;

    client.println("POST " + serverPath + " HTTP/1.1");
    client.println("Host: " + serverName);
    client.println("Content-Length: " + String(totalLen));
    client.println("Content-Type: multipart/form-data; boundary=RandomNerdTutorials");
    client.println();
    client.print(head);

    uint8_t *fbBuf = fb->buf;
    size_t fbLen = fb->len;
    for (size_t n=0; n<fbLen; n=n+1024) {
      if (n+1024 < fbLen) {
        client.write(fbBuf, 1024);
        fbBuf += 1024;
      }
      else if (fbLen%1024>0) {
        size_t remainder = fbLen%1024;
        client.write(fbBuf, remainder);
      }
    }
    client.print(tail);

    esp_camera_fb_return(fb);

    int timoutTimer = 10000;
    long startTimer = millis();
    boolean state = false;

    while ((startTimer + timoutTimer) > millis()) {
      Serial.print(".");
      delay(100);
      while (client.available()) {
        char c = client.read();
        if (c == '\n') {
          if (getAll.length()==0) { state=true; }
          getAll = "";
        }
        else if (c != '\r') { getAll += String(c); }
        if (state==true) { getBody += String(c); }
        startTimer = millis();
      }
      if (getBody.length()>0) { break; }
    }
    Serial.println();
    client.stop();
    Serial.println(getBody);
  }
  else {
    getBody = "Connection to " + serverName +  " failed.";
    Serial.println(getBody);
  }
  return getBody;
}

การแทรกข้อมูลรับรองเครือข่าย กล้อง และรายละเอียดเซิร์ฟเวอร์
ก่อนที่จะอัปโหลดโค้ด ต้องใส่ข้อมูลรับรองเครือข่ายในตัวแปรต่อไปนี้:
const char* ssid = "REPLACE_WITH_YOUR_SSID";
const char* password = "REPLACE_WITH_YOUR_PASSWORD";

ตรวจสอบให้แน่ใจว่าเลือกโมดูลกล้องที่ถูกต้อง ในกรณีนี้ใช้โมเดล AI-THINKER หากใช้กล้องรุ่นอื่นสามารถอ่านคำแนะนำบอร์ดกล้อง ESP32-CAM: การกำหนดพินและ GPIO
เพิ่มที่อยู่ IP Raspberry Pi หรือใช้ชื่อโดเมนเซิร์ฟเวอร์:

String serverName = "192.168.1.XXX";   // REPLACE WITH YOUR Raspberry Pi IP ADDRESS
//String serverName = "example.com";   // OR REPLACE WITH YOUR DOMAIN NAME
String serverPath = "/upload.php";     // The default serverPath should be upload.php

อัปโหลดโค้ดไปยัง ESP32-CAM
สามารถอัปโหลดโค้ดไปยังบอร์ด ESP32-CAM ได้แล้ว เชื่อมต่อบอร์ด ESP32-CAM เข้ากับคอมพิวเตอร์โดยใช้โปรแกรมเมอร์ FTDI

ทำตามแผนผังถัดไป:
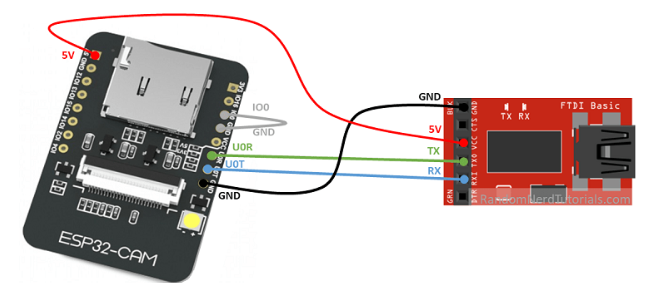
โปรแกรมเมอร์ FTDI จำนวนมากมีจัมเปอร์ที่ให้เลือก 3.3V หรือ 5V ตรวจสอบให้แน่ใจว่าจัมเปอร์อยู่ในตำแหน่งที่ถูกต้องเพื่อเลือก 5V
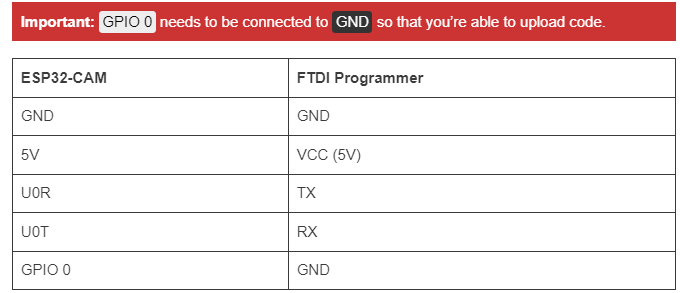
หากต้องการอัปโหลดโค้ด ให้ทำตามขั้นตอนถัดไป:
1.ไปที่เครื่องมือ > บอร์ด และเลือก AI-Thinker ESP32-CAM
2.ไปที่ Tools > Port แล้วเลือกพอร์ต COM ที่ ESP32 เชื่อมต่ออยู่
3.จากนั้นคลิกปุ่มอัปโหลดเพื่ออัปโหลดโค้ด
4.เริ่มเห็นจุดเหล่านี้ในหน้าต่างดีบั๊กดังที่แสดงด้านล่าง ให้กดปุ่ม RST บนบอร์ด ESP32-CAM
รหัสทำงานอย่างไร
ต่อไปนี้เป็นคำอธิบายโดยย่อเกี่ยวกับวิธีการทำงานของโค้ด:
-นำเข้าไลบรารีทั้งหมด
-กำหนดตัวแปรที่จำเป็น
-กำหนดหมุดของกล้อง
-ในการตั้งค่า () คุณสร้างการเชื่อมต่อ Wi-Fi และเริ่มต้นกล้อง ESP32
-loop() มีตัวจับเวลาที่เรียกใช้ฟังก์ชัน sendPhoto() ทุก ๆ 30 วินาที
-คุณสามารถเปลี่ยนเวลาหน่วงนั้นได้ในตัวแปร timerInterval
ฟังก์ชัน sendPhoto() คือส่วนที่ถ่ายภาพจริงและส่งไปยังเซิร์ฟเวอร์ สามารถใช้ฟังก์ชันนั้นในโครงการอื่นๆ ที่จำเป็นต้องถ่ายและเผยแพร่ภาพถ่ายไปยังเซิร์ฟเวอร์
4. การทดสอบและการสาธิตขั้นสุดท้าย
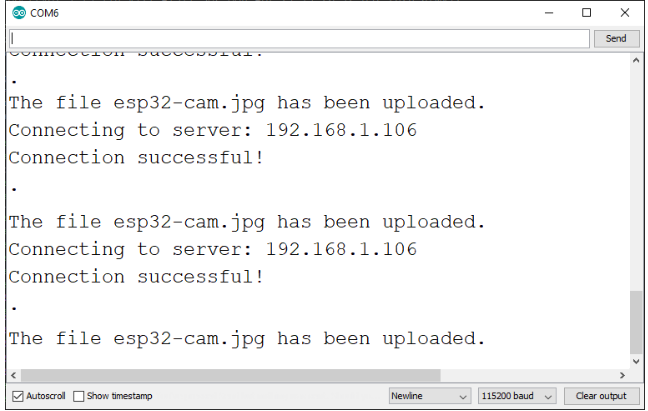
หลังจากอัปโหลดโค้ดไปยังบอร์ดแล้ว ให้เปิด Arduino IDE Serial Monitor และจะเห็นข้อความที่คล้ายกันพิมพ์ทุกๆ 30 วินาที:
The file esp32-cam.jpg has been uploaded.
ไปที่ URL เซิร์ฟเวอร์ภายในเครื่อง http://IP-Address/uploads หรือไปที่ URL เซิร์ฟเวอร์คลาวด์ https://example.com/uploads ควรมีโฟลเดอร์ที่มีรูปภาพที่เก็บไว้ทั้งหมด
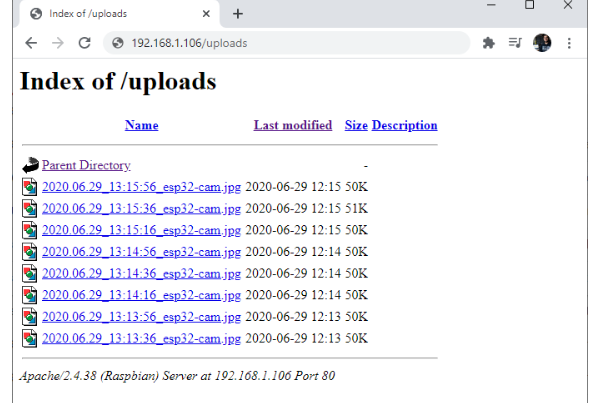
สามารถเปิดแต่ละลิงค์เพื่อเปิดหน้าใหม่พร้อมรูปภาพเต็ม:

ไปที่ URL เซิร์ฟเวอร์ภายในเครื่อง http://IP-Address/gallery.php หรือไปที่ URL
เซิร์ฟเวอร์คลาวด์https://example.com/gallery.php จะสามารถเข้าถึงหน้าแกลเลอรี ซึ่งสามารถเข้าถึงได้ ดูและลบรูปภาพ

หากต้องการลบรูปภาพใดๆ เพียงคลิกลิงก์ “ลบไฟล์” ถัดจากรูปภาพแต่ละรูป


